概要
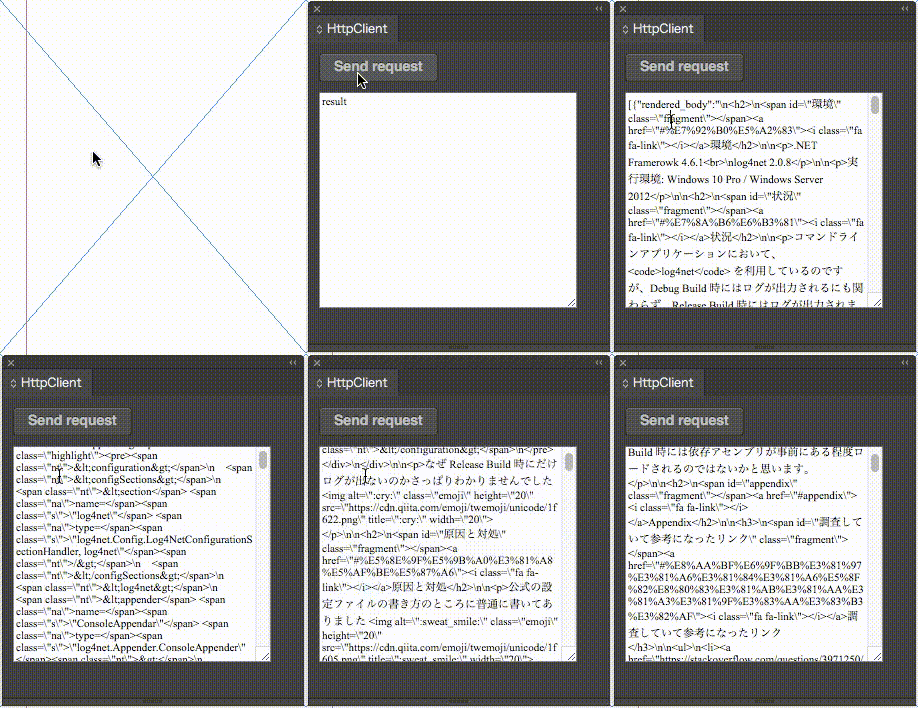
CEPから簡単にHTTPリクエストができると聞いたので、試しにQiitaのAPIにリクエストして、レスポンスのJSONをパネル上のテキストエリアに表示するサンプルを作った。
この記事でやること
- CEPからHTTPリクエストを行って、レスポンスをCEP上に表示する
この記事でやらないこと
- ExtendScriptとの連携
想定する環境
- macOS 10.13.4
- InDesign CC 2017
利用するAPI
最新の投稿を返却するAPI(https://qiita.com/api/v2/items)を利用する。
レスポンスはJSONで返ってくる。
CEPの実装をする
テンプレートプロジェクトを作成する
前回記事を参考に、テンプレートプロジェクトを作成する
manifest.xml を修正する
InDesign CC 2017で読み込めるようにする
テンプレートプロジェクトではInDesignの読み込みが無効化されているので、有効化して、かつバージョンにも対応する。
変更前
<!-- <Host Name="IDSN" Version="[10.0,11.9]" /> -->
変更後
<Host Name="IDSN" Version="[10.0,12.9]" />
Node.jsを有効にする
テンプレートプロジェクトではNode.jsが無効化されているので、有効化する。
変更前
<Resources>
<MainPath>./index.html</MainPath>
<ScriptPath>./jsx/hostscript.jsx</ScriptPath>
</Resources>
変更後
<Resources>
<MainPath>./index.html</MainPath>
<ScriptPath>./jsx/hostscript.jsx</ScriptPath>
<!-- ここから追加 -->
<CEFCommandLine>
    <Parameter>--enable-nodejs</Parameter>
</CEFCommandLine>
<!-- ここまで -->
</Resources>
index.html を修正する
リクエストを送信するボタンと、結果を表示するテキストエリアを用意する。
index.html
<!doctype html>
<html>
<head>
<meta charset="utf-8">

<link rel="stylesheet" href="css/topcoat-desktop-dark.min.css"/>
<link  id="hostStyle" rel="stylesheet" href="css/styles.css"/>

<title></title>
</head>

<body class="hostElt">
    <div id="content">
        <div>
            <button id="btn_send_request" class="topcoat-button--large hostFontSize">Send request</button>
        </div>
        <div>
            <textarea id="output_area">result</textarea>
        </div>
    </div>

    <script src="js/libs/CSInterface.js"></script>
    <script src="js/libs/jquery-2.0.2.min.js"></script>

    <script src="js/themeManager.js"></script>
    <script src="js/main.js"></script>


</body>
</html>
main.js を修正する
CEPからHTTPリクエストを送信するために、request モジュールを利用したかったんだけど、最新バージョンでは依存モジュールがCEP内蔵のNode.jsのバージョンでは利用できず、標準モジュールである http または https モジュールを利用した。
どちらのモジュールを利用するかは、リクエストする先のプロトコルにあったものを選択する。
例えば、http://www.macneko.com であれば http モジュール、https://www.google.co.jp であれば https モジュールを利用する。
main.js
/*jslint vars: true, plusplus: true, devel: true, nomen: true, regexp: true, indent: 4, maxerr: 50 */
/*global $, window, location, CSInterface, SystemPath, themeManager*/

(function() {
    'use strict';

    var outputArea = $('#output_area');

    var isNodeJSEnabled = function () {
        if (typeof(require) !== 'undefined') {
            outputArea.val("Node.js is enabled");
        } else {
            outputArea.val("Node.js is disabled");
        }
    };

    var sendRequest = function () {
        // Node.jsが有効になっていないとエラーになるので、require()がエラーになるため、try〜catchする
        try {
            var https = require('https');
        } catch(err) {
            outputArea.val(err);
            return;
        }

        // QiitaのAPI
        var url = 'https://qiita.com/api/v2/items';

        // APIにリクエスト開始
        https.get(url, function(res) {
            var body = '';
            res.setEncoding('utf8');

            res.on('data', function (chunk) {
                body += chunk;
            });

            // リクエスト処理完了
            res.on('end', function (res) {
                // レスポンスのJSONをStringにして、テキストエリアに出力
                var result = JSON.parse(body);
                outputArea.val(JSON.stringify(result));
            });

        }).on('error', function (e) {
            outputArea.val(e.message); //エラー時
        });

    };

    // ボタンクリック
    $(function() {
        $('#btn_send_request').click(sendRequest);
    });
})();
動作確認

ソースコード
https://github.com/macneko-ayu/CEP-Extensions-Sample/tree/master/com.macneko.HttpClient
まとめ
Node.jsがデフォルトで無効化されていることに気づくまでに時間がかかった。
次はCEP上でレスポンスのJSONをテーブルで表示させるものを作ろうと思っている。